Enter a Case number before making a call
As an example of customizing the Adapter for Microsoft Dynamics 365 we are going to add a custom input field to New Call screen and check entered Case number before making a manual call. We are going to take just a few steps to accomplish this:
- Create an HTML page that contains a customization
- Load the HTML page into the Adapter
0. Create Microsoft D365 solution
Before starting to work on the customization let's create a D365 solution where we will store all our assets. Please follow this instruction to create a new solution. See more about solutions here.
1. Customization HTML page
It will do the following:
- Add an input field to New Call screen using CustomComponentsApi#registerCustomComponents API
- Register HookApiCallbacks#beforeMakeCall hook
- Check that the entered Case number exists
Create HTML Web Resource
The HTML page will be a Web Resource in our solution. Follow this instruction to create a new Webpage (HTML) Web Resource.
We need to include two scripts to our page:
- To get an access to Microsoft native APIs
<script type="text/javascript" src="ClientGlobalContext.js.aspx"></script> - To get an access to Five9 CRM SDK
<script type="text/javascript" src="https://app.five9.com/dev/sdk/crm/latest/five9.crm.sdk.js"></script>
Add an input field
The below code will add an input field to New Call screen and save entered value to caseNumber variable.
let caseNumber = null;

const customComponentsApi = Five9.CrmSdk.customComponentsApi();
customComponentsApi.registerCustomComponents({
  template: `
    <adt-components>
      <adt-component location="3rdPartyComp-newcall-middle" style="flex-direction: column">
        <adt-input value="" id="caseNumber" name="caseNumberInput" label="Case Number" placeholder=""
                   onchange="onCaseNumberChanged">
        </adt-input>
      </adt-component>
    </adt-components>`,
  callbacks: {
    onCaseNumberChanged({ value }) {
      caseNumber = value;
    }
  }
});
Register beforeMakeCall hook
beforeMakeCall hook will validate entered case number and returns Proceed status code when a case number is valid. Otherwise returns Error (see HookApiStatusCode)
const hookApi = Five9.CrmSdk.hookApi();
hookApi.registerApi({
  beforeMakeCall() {
    return isValidCaseNumber(caseNumber)
      .then(valid => {
        if (valid) {
          return { status: { statusCode: Five9.CrmSdk.HookStatusCode.Proceed } };
        } else {
          return {
            status: {
              statusCode: Five9.CrmSdk.HookStatusCode.Error,
              message: 'Please enter a valid case number!'
            }
          };
        }
      });
  }
});
Check Case exists
We are going to implement a helper method that takes a case number and search cases that end with this number. If there are no and more then one case found the method returns false. Otherwise it returns true.
const isValidCaseNumber = number => {
  return fetch(
    Xrm.Page.context.getClientUrl() +
      `/api/data/v9.1/incidents?$select=incidentid&$filter=endswith(ticketnumber,'${number}')`,
    {
      headers: {
        'OData-MaxVersion': '4.0',
        'OData-Version': '4.0',
        'Accept': 'application/json',
        'Content-Type': 'application/json; charset=utf-8',
        'Prefer': 'odata.include-annotations="*",odata.maxpagesize=2'
      }
    }
  )
    .then(response => {
      if (!response.ok) {
        throw new Error('Network response was not OK');
      }
      return response.json();
    })
    .then(result => result.value.length === 1);
};
Put it all together
Here is the complete HTML page code:
<html><head>
    <meta charset="UTF-8">
    <title>Five9 CRM SDK Demo</title>
    <script type="text/javascript" src="ClientGlobalContext.js.aspx"></script>
    <script type="text/javascript" src="https://app.five9.com/dev/sdk/crm/latest/five9.crm.sdk.js"></script>
    <script type="text/javascript">
      let caseNumber = null;

      const isValidCaseNumber = number => {
        return fetch(
          Xrm.Page.context.getClientUrl() +
            `/api/data/v9.1/incidents?$select=incidentid&$filter=endswith(ticketnumber,'${number}')`,
          {
            headers: {
              'OData-MaxVersion': '4.0',
              'OData-Version': '4.0',
              'Accept': 'application/json',
              'Content-Type': 'application/json; charset=utf-8',
              'Prefer': 'odata.include-annotations="*",odata.maxpagesize=2'
            }
          }
        )
          .then(response => {
            if (!response.ok) {
              throw new Error('Network response was not OK');
            }
            return response.json();
          })
          .then(result => result.value.length === 1);
      };

      const hookApi = Five9.CrmSdk.hookApi();
      hookApi.registerApi({
        beforeMakeCall() {
          return isValidCaseNumber(caseNumber)
            .then(valid => {
              if (valid) {
                return { status: { statusCode: Five9.CrmSdk.HookStatusCode.Proceed } };
              } else {
                return {
                  status: {
                    statusCode: Five9.CrmSdk.HookStatusCode.Error,
                    message: 'Please enter a valid case number!'
                  }
                };
              }
            })
            .catch(error => {
              return {
                status: {
                  statusCode: Five9.CrmSdk.HookStatusCode.Error,
                  message: `Could not check case number. Please contact your administrator (${error})`
                }
              };
            });
        }
      });

      const customComponentsApi = Five9.CrmSdk.customComponentsApi();
      customComponentsApi.registerCustomComponents({
        template: `
          <adt-components>
            <adt-component location="3rdPartyComp-newcall-middle" style="flex-direction: column">
              <adt-input value="" id="caseNumber" name="caseNumberInput" label="Case Number" placeholder=""
                         onchange="onCaseNumberChanged">
              </adt-input>
             </adt-component>
           </adt-components>`,
        callbacks: {
          onCaseNumberChanged({ value }) {
            caseNumber = value;
          }
        }
      });
    </script>
  </head>
  <body>
  </body>
</html>
2. Load HTML page
There are several steps we need to take here:
- Create Script (JScript) Web Resource
- Update VCC Configuration to run the loader on application start (NOTE: This will require to enable External JS/CSS functionality on you domain. Please contact your Five9 representetive to enable it.)
Loader JavaScript file
Below is a code snipped of a loader. You need to change a path_to_html to your HTML Web Resource (it's shown on a Web Resource edit page).
define('3rdparty.bundle', [], function () {
  function appendIFrame(name, url) {
    const iframe = document.createElement('iframe');
    iframe.id = name;
    iframe.name = name;
    iframe.src = url;
    iframe.height = '0px';
    iframe.width = '200px';
    iframe.style.display = 'none';
    window.document.body.appendChild(iframe);
  }

  appendIFrame('customization', 'https://<path_to_html>');
});
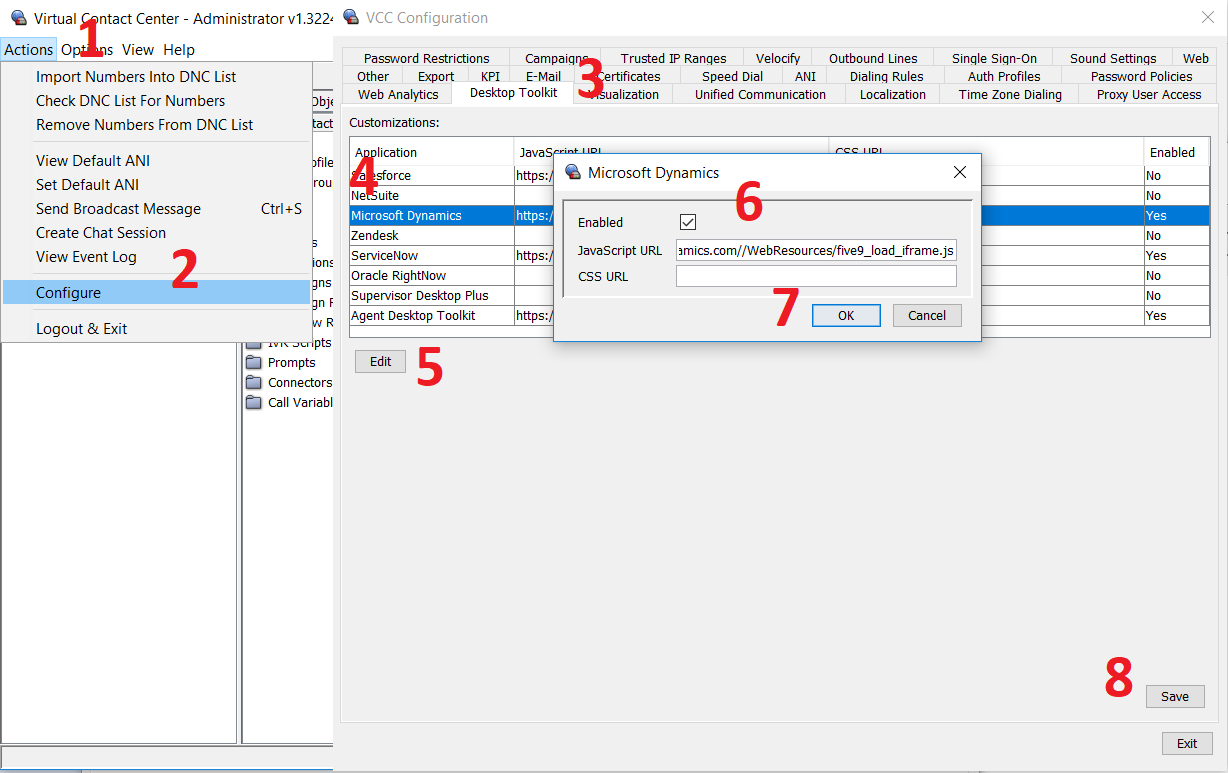
VCC configuration
Modify VCC Configuration to run the loader on the adapter start:
- Go to Actions
- Go to Configure
- Open Desktop Toolkit tab
- Select Microsoft Dynamics entry
- Press Edit
- Past path to JScript Web Resource into JavaScript URL field and check Enabled
- Press OK
- Press Save
